| Time (mins) | Section |
|---|---|
| 0 | Introduction |
| 5 | Warm up |
| 15 | Drill: Forehand throws |
| 30 | Drill: Cutting shapes |
| 45 | Games |
| 80 | Wrap up |
Lesson 2 - Forehands and Cutting Drills
Session Plan
- Time: 90mins
- Equipment required: 5 discs per 10 people, cones, bibs
Introduction (5 mins)
- Coaches introduce themselves and the club.
- Go over any health and safety info.
- Fire exits, toilets, water, first aid etc.
- Ask:
- Who was at the first session?
- Are there any first time players?
- Get someone to volunteer to help new players get up to speed.
- In today’s session we are going to learn to throw forehands and how to get open for a pass.
Warm up (10 mins)
Tailor the warm up to the group:
- E.g. Full dynamic warm up for sporty adults / teenagers
- Tag Frisbee for kids or for a more fun session.
- Played like a regular game of ultimate.
- When a player catches a disc they can choose to run with it.
- If they are tagged while running and holding the disc, it is a turnover.
- Players can pass while running and even pass to themselves.
- A tag does not count if the disc is airborne.
- A player that catches and immediately establishes a pivot foot cannot be tagged.
Demo and drill (15 mins) - Forehand throws
Demo forehands
- Grip
- Use the gun grip.
- Two fingers on the inside of the rim, thumb on top.
- Stance
- Start in neutral stance.
- Keep your hips and chest facing receiver, step wide and sink into a pivot.
- Hold the disc away from your body.
- Release
- Push the elbow forward and flick the wrist, like using a whip
- Finish the throwing action towards your target.
Drill - Forehands and clap catches
- Groups of 2 or 3 depending on number of discs.
- Throw to a stationary receiver.
- Coaches can float around and offer help.
If you have time…
- The scoober and hammer throws also use the forehand grip. See if they can attempt these.
Coaching points
- Encourage players to focus on the snap. Point the wrist at the receiver and use a whipping motion.
- If players fail to get the wrist snap, get them to hold the disc out with their elbow pushed forwards. Pull the disc back for them to create tension in the wrist, like a loaded slingshot. Move the disc back and forth so they can feel the snapping motion.
- Watch out for:
- Players swinging their arm across their body, causing the disc to turn to the ground. Encourage finishing the throw out in front or on the same side of their body.
- Players adopting a side-on stance that causes them to over rotate and throw roll curve. Encourage them to pivot wide and keep their hips facing forwards.
- Sometimes players get confused and start throwing left handed or throwing a backhand with a forehand grip.
- Carry a spare disc with you to demonstrate the grip and release. You can also give this to players when their discs go astray to keep them focused on the drill.
Drill (15 mins) - Cutting patterns
Demo cutting
Give a brief introduction to the concept of cutting and the different types of cuts.
- Cutting is the term we use when players run to get open for a pass.
- Good cuts are fast, decisive, have sharp changes of direction and create space for the throw.
- Players struggle to get open when their cuts:
- Are too short.
- Are too close to the disc.
- Don’t include changes of direction.
- Include too many changes of direction.
Cutting deep
Deep cuts are used to get big gains upfield. Cut to score and don’t hesitate, the disc is faster than you! Going deep also opens up space for an under cut.
- Start shallow so the throw can go out in front.
- Start wide of the throwing lane to give room for the throw and allow you to see it coming.
- Sprint deep and check over your shoulder to see if the disc is coming.
Cutting under
If you don’t get thrown to deep, you want to come back under. You can make big gains on an under cut and simultaneously free up the deep space for another attacker.
- Turn hard to beat your defender.
- Cut under on an angle towards the throwing lane.
- Keeps the throwing lane free for other throws.
- Allows for a greater margin of error on the throw.
- Gives better continuation options when you receive the disc.
Drill - Cutting shapes
Deep and Under
- Cutter goes straight deep then cuts under for the disc.
- You can place a cone at the point they should cut under, allow them to find a good spot, or use communication from the thrower (a shout or a fake).
- Set up a backhand and forehand drill.
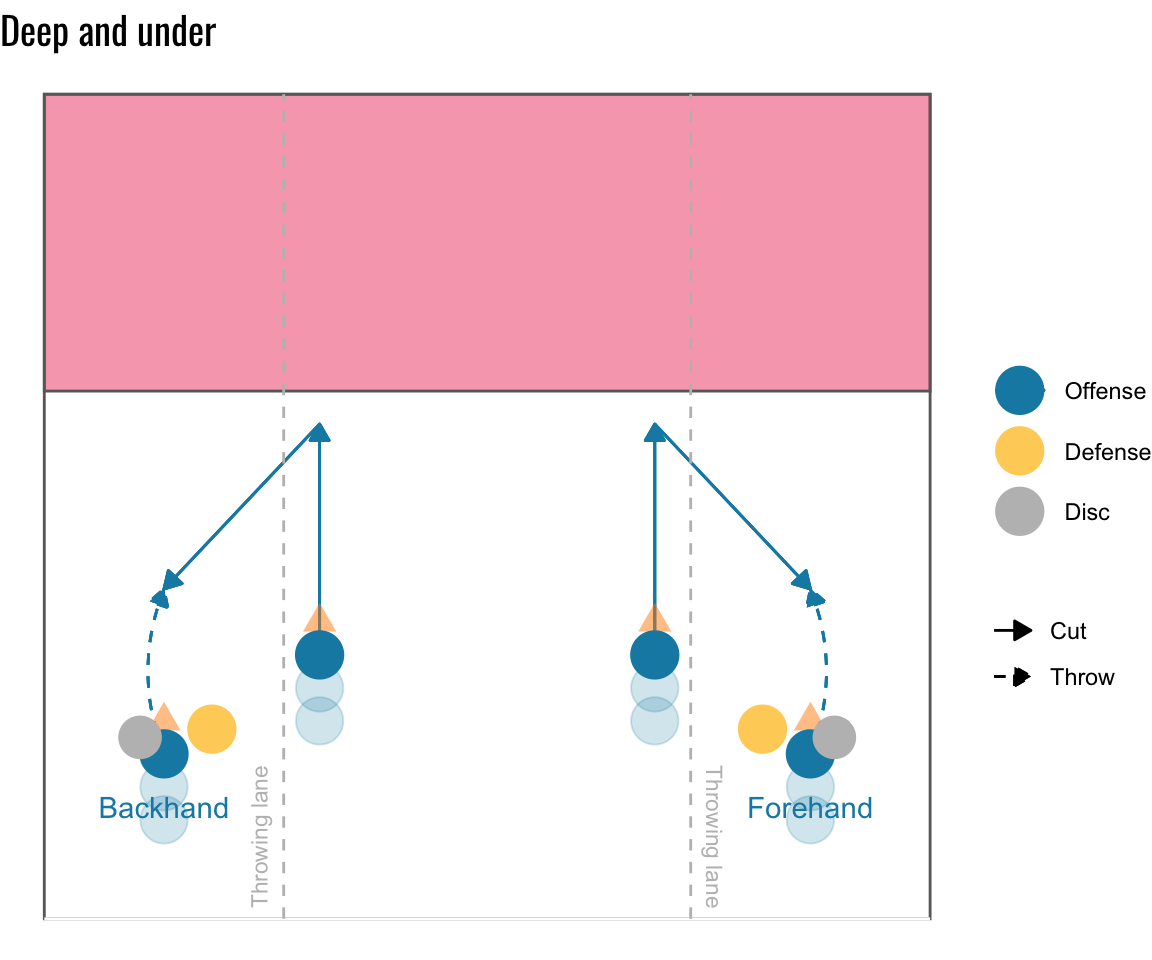
Rotation
- Force
- Throw
- Cut
- Take your disc to the opposite throwing queue
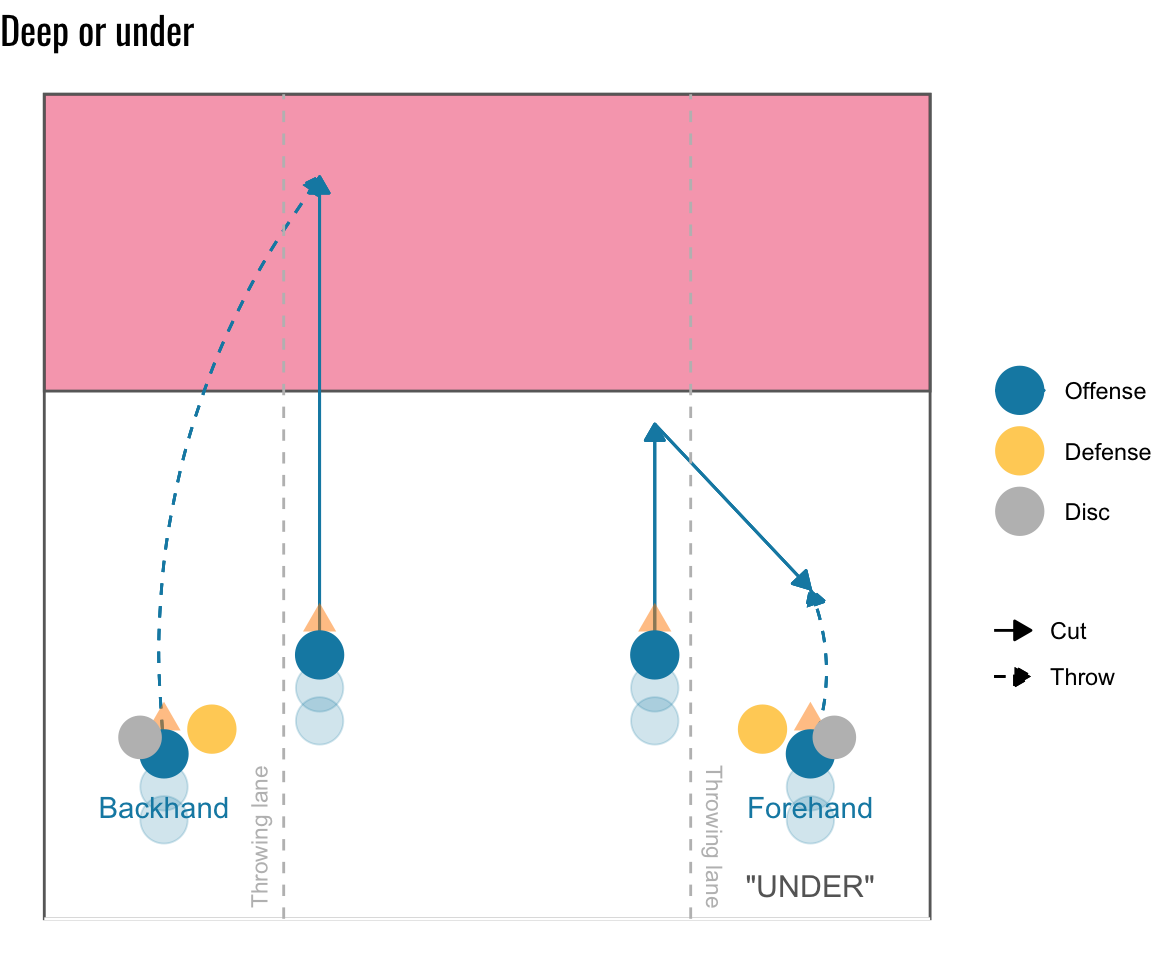
Deep OR Under
- Same as above but the cutter goes deep for a scoring pass.
- The thrower can call them back under with a shout or a fake.
Coaching points
- Throws should go up the throwing lane for the receiver to run on to. Don’t aim directly for the player.
- Focus on completions rather than big throws. If the cutter is too deep, call them under.
- Encourage good timing from the cutters and early throws into space.
- Encourage cutters to attack the disc and visualise a defender on their back.
- Keep reiterating staying wide on deep cuts.
Rule Check
In these drills, you might have people make catches close to the lines. This would be a good time to discuss the out of bounds rules.
In or out?
- A receiver is in bounds if their first point of contact with the ground, after catching the disc, is in the pitch.
- This is usually a foot but can be any part of the body.
- If they land with two feet at the same time and one of these is out of bounds, then the receiver is out.
- The lines in Ultimate are out of bounds. The line at the front of the endzone does not count as a score, the receiver must be fully in the endzone.
Games (30mins)
Small-sided games are best but it depends on numbers. Try to do 5-a-side if players have played before. Depends on space etc. Decide whether to do mixed gender or to split, this will entirely depend on the group.
Get two teams setup on a pitch at each endzone. Go over the basic ruleset again.
Game ideas
- Start the match with infinite endzones (a scoring line but no back of endzone). This encourages players to keep cutting deep, even on a short pitch.
Rule Check
Now that players have played a few games, you could introduce the concept of stalling.
Stall out
- The defender marking the player with the disc starts at 0 and counts up in 1 second increments.
- If they reach 10s, or 8s indoors, then it is a turnover.
- The player with the disc places the disc on the ground and the defending team pick it up.
- The thrower can call a fast count if they think the defender is counting too quickly. They can also contest a stall out if they believe they threw the disc before the defender reached the count.
Wrap Up (10 mins)
- Ask if anyone has any questions about rules or the sport in general.
- Ask if everyone enjoyed the session.
- Hand out stickers/flyers and give some info on the club.
Next week
- More throwing skills
- Quick disc movement
- SOTG
Homework
- Challenges and crossword search.
- Practice forehand throws.